DrawIO to CBD Conversion
DrawioConvert is a project that allows conversion from simple, yet structured draw.io diagrams to CBD models that can be interpreted by the CBD simulator. This document will describe how this can be done.
Setting up DrawIO
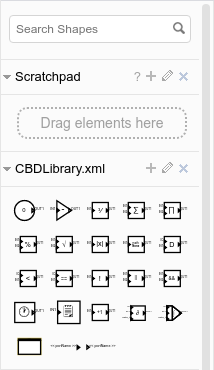
In drawio, select File > Open Library and load CBDLibrary.xml. This provides a set of primitive CBD blocks that can be used in your models. Once included, it can be found at the top of the shapes library.
Block Properties
All blocks in the library have some block-specific properties that can be set by the user. Hovering over a component shows all non-empty properties that were set on this shape.
There are several ways of accessing/modifying these properties:
- Double Click with the left mouse button on a shape.
- Click with right mouse button to open a shape's context menu. Near the bottom of the list, select Edit Data.
- Select the shape (left mouse button) and in the top of the right panel, go to Arrange > Edit Data.
- Select the shape and press CTRL + M or CMND + M.
Working with Library Blocks
To guarantee a consistent visual appearance of CBD models, no blocks in the library, except for the Custom Block, can be resized. Every block has zero or more input and output ports. Input ports are represented by the InputPortBlock (black triangle) and output ports by the OutputPortBlock (white triangle). When selecting (left mouse button) a port, a small, movable, yellow/orange diamond-shaped anchor will appear in front of the port's name. The position of this label can be changed by dragging the anchor. The port name can be altered in the Edit Data window.
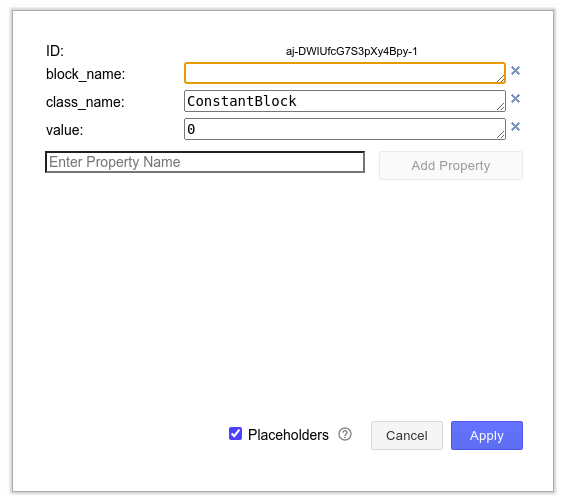
Each CBD block that is not a port may have the following properties:
- ID or id
- The drawio unique ID for this block. Note that drawio automatically overwrites a property with the key id by the value shown by ID (upon saving the diagram).
- block_name
- The name of the block. It is required that all blocks have a unique name within a class. When omitted, the ID is used. It is encouraged to set this attribute to help with the debugging process of CBDs.
- class_name
-
The type of block.
Do not change the class_name as the converter relies on this property. Changing it makes it so the block type changes as well in the simulation. - symbol
- The block symbol that must be rendered by MathJax/LaTeX. This is a purely graphical attribute and is ignored by the script.
Optionally, additional class parameters can be provided by adding more properties. Their values will be passed on as default values for the corresponding property as an argument, e.g., to use strings, enclose the value in "..." or '...', for None, leave it empty or literally type "None"...
Make sure these values are expressions/rvalues! If not, the generated Python file will crash, or cause some unexpected behavior. Furthermore, newlines may not be used in these values.
Class parameters that cannot be used are: label (prevented by drawio), id (overwritten by drawio), placeholders (prevented by drawio), symbol (ignored by the converter) and __docstring__ (used for other purposes, see later).
Note: Blocks with a variable number of inputs (i.e., the OrBlock and the AndBlock) may still need additional ports to be placed/removed.
Creating Custom CBD Blocks
A custom hierarchical CBD block is constructed as a network of already provided blocks (which in their own right may be custom hierarchical blocks) using the Custom Block element from CBDLibrary.xml. This is a collapsible component in which a block diagram may be drawn. It has two important properties:
- class_name
- The new class name for the custom block. Note that all class names must be unique!
- block_name
- The name of an instance of the CBD model if it's the top-level CBD.
Additional properties can be added to create custom class parameters. The same set of parameters that was discussed above cannot be set, with the exception of __docstring__, which allows adding documentation to custom blocks.
The empty rectangle is a container for the custom hierachical block. Blocks can be dragged into the rectangular area and connected. InputPortBlock and OutputPortBlock are used to add inputs and outputs with their name property set to the port's name. The Custom Block component can, in constrast with all other blocks in the library, be resized. This allows for larger hierarchical models to be created, as the basic blocks cannot be resized.
In the figure below, a custom Sine Generator block with no input ports, a single output port and a custom graphical representation is shown.
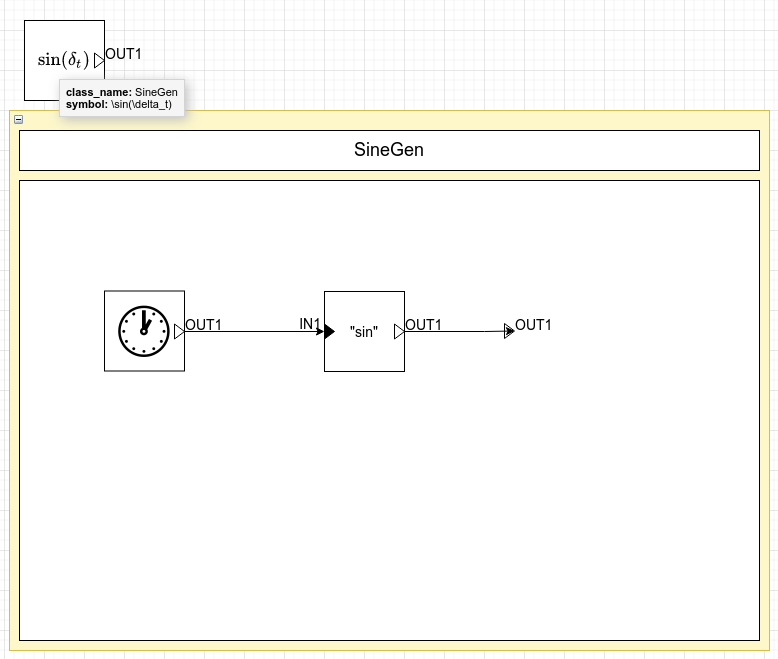
Next, create a graphical representation of the block (i.e., what an instance block should look like when used in a block diagram), add the corresponding ports and set the property class_name to the same class as that set in the Custom Block. Make sure not to forget to add any class parameters that were added to the Custom Block.
This can be done easily by adding a predefined block and changing its ports and properties to match the new custom block.
Only the Custom Block components will be read by the converter. Anything else is implicitly ignored. Furthermore, when using the -S/--singlefile flag, the script is page-independent, meaning multiple pages may be used inside a single drawio document to maintain a clean overview of the created models. When not using this flag (default), a new model file will be created for each page.
Conversion
To generate code from the created drawio files, execute the the __main__.py file with the -F CBD flag. This tells DrawioConvert to use the CBD formalism. Two files will/can be created:
- model.py
- The model file, containing the code for the modelled blocks.
- experiment.py
- The "protected" experiment file. You can feely add/remove parts of this file without fear of it being overwritten next execution. Use the -f/--force flag to force overwrite the file.
It is possible to use continuous models, where they are discretized to a certain delta. This is customizeable using the -E/--environment flag. I.e. by setting -E delta=0.1, it is possible to execute in steps of 0.1 time-units. Note how -t/--time identifies the total simulation time, not the amount of steps taken.
For instance, to create a Python file from the custom Sine Generator, as shown above, the following command can be used:
python __main__.py -F CBD -e SineGen -sSrgv sinegen.drawio -E delta=0.1where:
- the CBD formalism is used (-F CBD),
- an experiment file should be created once, where SineGen is the executable CBD model (-e SineGen),
- all empty CustomBlocks should be ignored (-s),
- all pages should be merged into one file, starting from the last page (-Sr),
- all imports are assumed to be global to all model and experiment files (-g),
- verbose generation is enabled (-v),
- the experiment file and model file will set a global variable DELTA_T to 0.1, as well as setting the default simulation stepsize to this value (-E delta=0.1).
Use the -h/--help flag to get more information on the available flags.